
To my ladies that sport some Lilly, and to those who do not, Hi! I'm Rachel and I blog over at Sunshine and Sinatra. So I am certainly not the most preppiest person ever, let that be known. However there is nothing I enjoy more than eyeing down some frat boys dressed from head to toe in whale prints. Bows and pearls? So my thing.


A little about me: I'm in my sophomore year of college as a Public Relations major with a minor in event planning. I enjoy nothing more than waking up early to paint, peanut butter anything, and basic colored shirts. Majority of my closet consists of Striped shirts. I can not get away! When I'm not eating peanut butter, I'm blog-stalking, pageant-obsessing (I've competed in two) or devouring chocolate covered gummy bears. I know I look like I'm about 16 or 17, and I'm not okay with that but everyone says I will be later in life. I love Singing in The Rain (movie), and Frank Sinatra (Aka name behind the blog). Come stalk me for yourself!
*If you ever need a blog design/ or want a Lilly print designed for YOU, contact me @ sunshineandsinatra@gmail.com*
Like I said, to you Lilly Ladies, this is for you. (I'm thinking most of you are Lilly Lovers considering you follow the amazing Private School Prepster). I once did a DIY as a guest post for another blog on Lilly DIY prints, but this time I'm spicing it up a bit. I made a Lilly Picture frame based off of the actual Lilly design First Impression. Clearly I added my own twist to it!
Materials include: Frame (or surface you are painting), paint (I'd say about 3-4 different colors plus a robins egg blue color), brushes, glue.
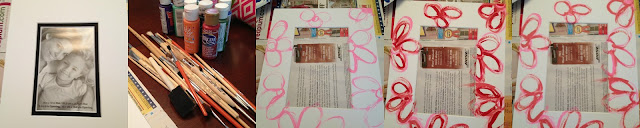 1. Grab materials, obvi.
2. Feel free to check the actual print itself to try to be as accurate as possible!
3. Outline a flower, like above, in your lightest color.
4. Outline again in a bit darker color
5. Outline again in a darker color.

6. Outlined again in orange and yellow (back to lighter colors)
7. Took a bit larger brush, as well as a much smaller one for the small cracks, and painted the outside blue in two coats.
8. being that this is a matte that is supposed to be inserted in a picture frame, I had to glue it together using the best glue ever. It's LOCTITE SUPER GLUE. except, be careful you don't get your fingers stuck together. It can happen.
Voila! The final product!

I added a picture of me and my sister in the middle to see how it would turn out - hanging up in my dorm now! If you are a prepster, get this: my sister runs a blog too! A much more prettier one than mine. It's called The Atelier! She also has the greatest handwriting ever that turned into custom cards for ya! Check out her shop here. Aren't you just dying over her illustrations?!

Materials include: Frame (or surface you are painting), paint (I'd say about 3-4 different colors plus a robins egg blue color), brushes, glue.

2. Feel free to check the actual print itself to try to be as accurate as possible!
3. Outline a flower, like above, in your lightest color.
4. Outline again in a bit darker color
5. Outline again in a darker color.

6. Outlined again in orange and yellow (back to lighter colors)
7. Took a bit larger brush, as well as a much smaller one for the small cracks, and painted the outside blue in two coats.
8. being that this is a matte that is supposed to be inserted in a picture frame, I had to glue it together using the best glue ever. It's LOCTITE SUPER GLUE. except, be careful you don't get your fingers stuck together. It can happen.
Voila! The final product!


I added a picture of me and my sister in the middle to see how it would turn out - hanging up in my dorm now! If you are a prepster, get this: my sister runs a blog too! A much more prettier one than mine. It's called The Atelier! She also has the greatest handwriting ever that turned into custom cards for ya! Check out her shop here. Aren't you just dying over her illustrations?!
You can even get them customized!
If you are interested in checking out my latest crafts and adventures be sure


You made this look so easy, love it!
ReplyDeletexoxo
polishedinpearls.blogspot.com